|
Yanmar SB12:
Gauge Panel and Controls
This page was last updated on 17
July 2001
Gauge Panel
 On
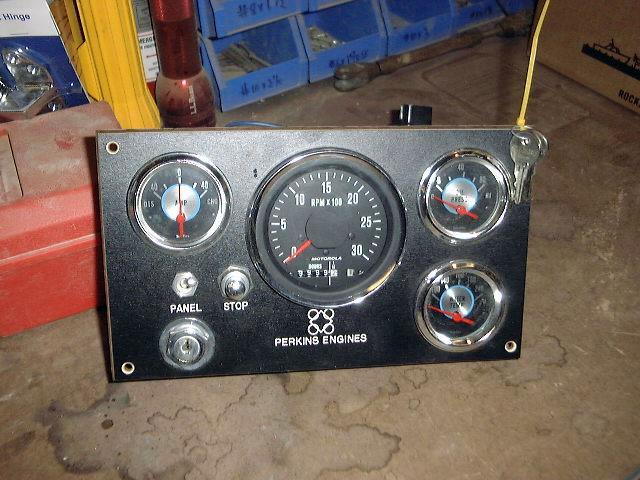
a recent trip to a consignment shop in Rhode Island, I happened upon a brand-new
gauge cluster sitting on a shelf. It contained an ignition switch,
tachometer, hourmeter, ammeter, oil pressure gauge and water temperature gauge,
all installed in a nice phenolic panel--exactly the combination I was intending
to install. In addition, the panel is pre-wired for lighting, and included
a long wiring harness.. It was apparently intended for a Perkins engine,
as that is stamped on the panel. How could I pass it up? Some quick
arithmetic seemed to indicate that the panel was a good deal, so I bought it. On
a recent trip to a consignment shop in Rhode Island, I happened upon a brand-new
gauge cluster sitting on a shelf. It contained an ignition switch,
tachometer, hourmeter, ammeter, oil pressure gauge and water temperature gauge,
all installed in a nice phenolic panel--exactly the combination I was intending
to install. In addition, the panel is pre-wired for lighting, and included
a long wiring harness.. It was apparently intended for a Perkins engine,
as that is stamped on the panel. How could I pass it up? Some quick
arithmetic seemed to indicate that the panel was a good deal, so I bought it.
I plan to install the gauge panel
in the old lazarette opening at the aft end of the cockpit. Since I have a
new top access hatch, the old vertical hatch is no longer needed.
This is also a nice protected location while remaining convenient for the
operator to view as necessary.
The first thing to do was to
build a wooden framework and trim detail to hold the panel and trim out the
opening. The frame will overlap the opening and provide a recessed area
for the panel. After measuring the opening, I cut to size some 1 3/4"
mahogany to the appropriate sizes and glued up a basic frame. Then, I cut
a piece of mahogany plywood to size to fit behind the frame, and made the cutout
for the gauge panel in the center.
|
|
My epoxy resin was thick and cold
and impossible to pump, so I turned to my supply of polyurethane glue (Titebond)
to glue up the frame pieces. This is a good glue that I have used before,
and is easier to deal with than mixing epoxy. After letting the frame set
up overnight, I unclamped it and prepared for the next operation. As I set
it down on the bench, it broke back into four pieces. Obviously, the glue
hadn't worked properly. Stupidly, I tried again with the same glue, only
to have the same end result the next day. Duh. I cleaned up the glue
joints, warmed the epoxy in front of my heater, and reglued the frame with my
standard thickened epoxy mixture. Success was had the next day when I
unclamped.
The next step was to sand off any
cured epoxy that had squeezed out, and then to round over the top edges with a
1/4" roundover bit in my router table. With that done, I milled a
rabbet on on the underside of the frame, which will allow the frame to be
inserted into the hole in the cockpit and secured in place through the
overlap. Then I sanded the frame smooth.
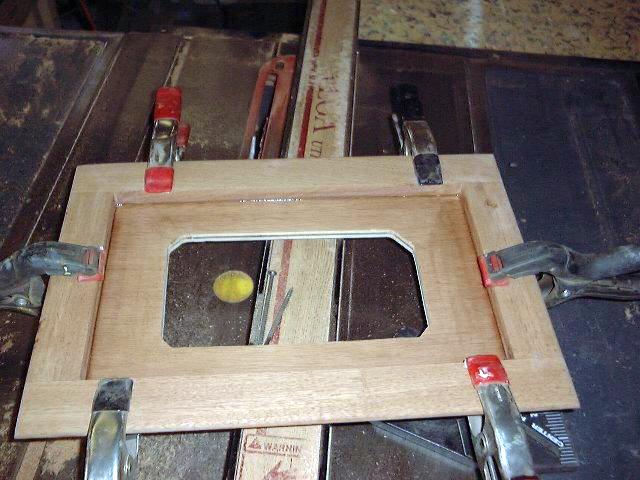 I glued the plywood back onto the
frame with epoxy (no experiments this time) and left it to cure overnight.
To prevent excess spillout from staining the wood or making too much of a mess,
I first taped off the adjacent surfaces. This made it easier to clean up
the epoxy, and I removed the tape once things were clamped in place. When
the epoxy cured, I sanded the piece again and began applying the requisite 10
coats of varnish before final installation. I glued the plywood back onto the
frame with epoxy (no experiments this time) and left it to cure overnight.
To prevent excess spillout from staining the wood or making too much of a mess,
I first taped off the adjacent surfaces. This made it easier to clean up
the epoxy, and I removed the tape once things were clamped in place. When
the epoxy cured, I sanded the piece again and began applying the requisite 10
coats of varnish before final installation.
The panel came with a lengthy
wiring harness, with plugs at each end. Obviously, the harness will not
simply plug into the engine, but having all the wires bundles and ready to go is
another great aspect of the new panel. Among the wires included are the
important leads for the ignition switch and tachometer input, but also sender
wires for the other gauges, as well as a panel lighting circuit.
|
|
With my engine service manual at
hand, I hooked up the wires as necessary. After running the entire harness
from the panel location to the engine room, leaving a little slack at the panel
end, I removed the plug from the engine end--since it will be unnecessary--and
began running the individual wires as needed. To do this, I first
determined which wire was which by tracing them at the panel end and noting the
colors and destination. Then, at the other end I could figure out which wire to
run 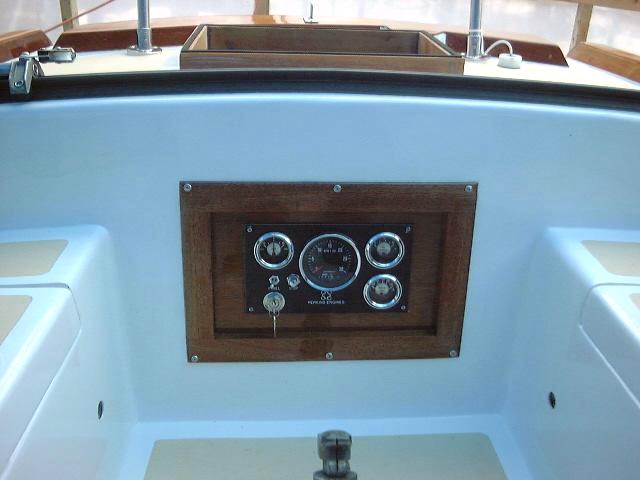 where. I ran the wires to the tachometer feed, the starter solenoid,
and senders for the oil pressure and water temperature. The ammeter will
have to wait for now--it requires a shunt to properly wire, and isn't too
critical with the battery monitoring equipment I have installed.
I installed the wooden surround
in a bed of silicone with six screws and finishing washers, so I can remove it
as necessary. As always, I taped everything off to make cleanup
easier. With the surround installed, I installed the panel in the opening,
again with silicone caulk and screws. It was a simple matter to plug the
connectors together and, theoretically, the panel should work now. Testing
soon--the firing of the engine!
UPDATE 7/17/01:
Because we are replacing the engine, we will be replacing the panel with the
standard Yanmar "B" panel that comes with the engine. Please
click here for details on the new panel and its
installation.
|
|
Engine
Controls
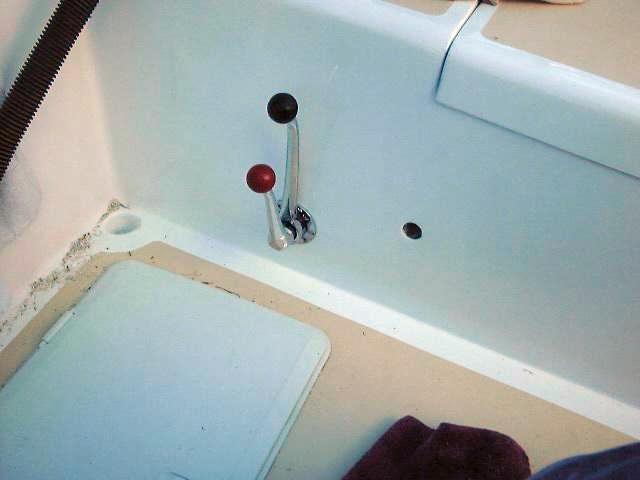 I purchased a new set of engine
controls, as the old controls that came with the engine weren't really worth
salvaging. I drilled a 1-1/4" hole through the cockpit side where I wanted
them--there was already a plywood backer block installed here, left over from
the original control installation, so I didn't have to worry about reinforcing
the cockpit side at all. Then, it was a fairly simple matter to install
the controls with sealant and stainless bolts. I purchased a new set of engine
controls, as the old controls that came with the engine weren't really worth
salvaging. I drilled a 1-1/4" hole through the cockpit side where I wanted
them--there was already a plywood backer block installed here, left over from
the original control installation, so I didn't have to worry about reinforcing
the cockpit side at all. Then, it was a fairly simple matter to install
the controls with sealant and stainless bolts.
I fought with the cables and
their installation over several days, running back and forth for the right
cables and the right connectors. The worst part of the job was the access
to the back of the controls--there's a deep molded channel beneath the cockpit
seat, which acts as a drain, and this prevents clear access to the
controls. I have to lean way over, upside down, through the locker to see
back there...dizzy!
|
|
 The
control cables are clamped in place on a board I epoxied in place aft of the
controls, and are secured to the backs of the controls with Morse connectors
(clevis). The cables are Morse 33C. The
control cables are clamped in place on a board I epoxied in place aft of the
controls, and are secured to the backs of the controls with Morse connectors
(clevis). The cables are Morse 33C.
|
|
 The
throttle cable attaches to the engine with a ball joint connector. The
cable runs aft along the port side, and beneath the cockpit to the controls. The
throttle cable attaches to the engine with a ball joint connector. The
cable runs aft along the port side, and beneath the cockpit to the controls.
|
|
 The
gear cable attaches to the shift lever on the engine with a part that I
purchased from Yanmar specifically for this engine. Unfortunately,
the 3" throw of the 33C cables is insufficient to fully operate the gear
lever between forward and reverse. The next step towards correcting this
is to move the connector further down on the gear lever, where less throw is
required. this will make the cable lose leverage, however, so it may not
work. After that, the next thing to try is to purchase a Morse 43 series
cable, which has a 4" throw. These are the kinds of frustrating
details that you have to deal with at this stage of any project...but I'm about
ready to use the Yanmar as an anchor! The
gear cable attaches to the shift lever on the engine with a part that I
purchased from Yanmar specifically for this engine. Unfortunately,
the 3" throw of the 33C cables is insufficient to fully operate the gear
lever between forward and reverse. The next step towards correcting this
is to move the connector further down on the gear lever, where less throw is
required. this will make the cable lose leverage, however, so it may not
work. After that, the next thing to try is to purchase a Morse 43 series
cable, which has a 4" throw. These are the kinds of frustrating
details that you have to deal with at this stage of any project...but I'm about
ready to use the Yanmar as an anchor!
|
  I
also installed a stop cable, which runs from the decompression lever on the
engine to a control I purchased, which I installed in the cockpit forward of the
control levers. I
also installed a stop cable, which runs from the decompression lever on the
engine to a control I purchased, which I installed in the cockpit forward of the
control levers. |
|
So the gear
cable failed, unsurprisingly. To combat the problem with the 3"
throw, I moved the cable further down the gear lever to another mounting positing--one
that would require less through, but more leverage. Before trying this, as
a backup I ordered a 64 series cable--this is a heavy-duty cable (about
5/8" thick) with a 4" throw, and is intended for manual transmissions
like this. It was expensive--but when the cable arrived I knew why, as it
is a serious piece of hardware. With the heavy cable held in reserve, I
figured I'd try the easy thing first. After moving the cable connection on
the engine, I secured the cable to a 2x4 that I epoxied to one of the fuel tank
supports. Then, I tested the gear lever. Snap! The threads
just broke near where the cable attached to the back of the gearshift. I
guess that cable didn't have the guts, as anticipated. Time to switch out
the normal cable for the heavy-duty one--and, at the same, time, replace the chintzy
Chinese-made engine controls, since it was increasingly obvious that they were
not going to be up to the task. |
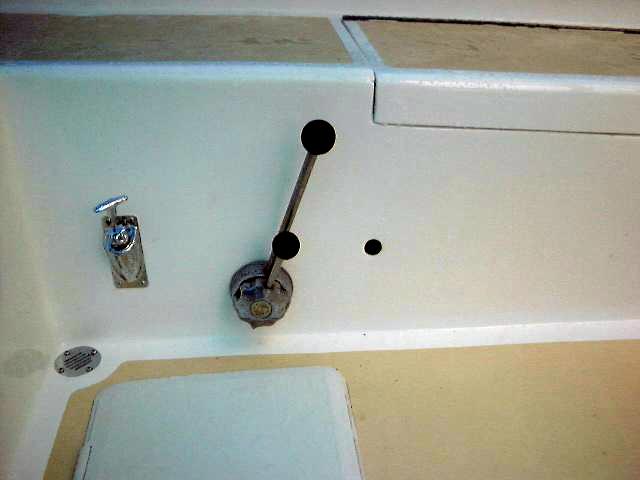 Fortunately,
I had the heavy duty Morse controls that came with the engine. They were
in decent condition, and I wish I had chosen to reuse them from day one.
Live and learn, I guess. To install them, I first removed the old
ones--anyone want them? Then, I had to enlarge the hole slightly to
accommodate the new housing. I installed it into the plywood backer with
screws, and then put together the controls as required. Every control is
different--either follow the instructions or pay attention as you disassemble an
old control and put it back together the same way, which is what I had to
do. It's not a hard job, except for the access--I had installed them
forward of the cockpit locker, and the drain channels really limit the
access. It means I had to nearly stand on my head to see the connections
at the back of the control, so the job took several times longer than it should
have. Fortunately,
I had the heavy duty Morse controls that came with the engine. They were
in decent condition, and I wish I had chosen to reuse them from day one.
Live and learn, I guess. To install them, I first removed the old
ones--anyone want them? Then, I had to enlarge the hole slightly to
accommodate the new housing. I installed it into the plywood backer with
screws, and then put together the controls as required. Every control is
different--either follow the instructions or pay attention as you disassemble an
old control and put it back together the same way, which is what I had to
do. It's not a hard job, except for the access--I had installed them
forward of the cockpit locker, and the drain channels really limit the
access. It means I had to nearly stand on my head to see the connections
at the back of the control, so the job took several times longer than it should
have. |
Next, I connected the existing
throttle cable--nothing too difficult here. Then, I ran the heavy cable
from the engine, through the lockers, and up to the back of the gearshift
lever. Now, the difficult part was to figure out how to secure the cable
casing against movement--without which the cable is useless, of course.
This is difficult because I couldn't find any parts for the series 64C cable
anywhere. No one seems to stock them--I guess I was fortunate that I was
able to get the cable. I did have one clamp left over from whatever boat
the engine originally came out of, and could use this on the control side of the
cable. To secure the engine side, however, was more difficult. Some
time back,  while leafing through my Yanmar parts manual, I had ordered a bracket
that was supposed to secure the control cable. I made it work by
installing a wooden support forward of the fuel tank, to which I screwed the
bracket, with the cable captured inside. It didn't end up working, but I
was able to adapt a smaller clamp meant for one of the 33C cables and attach it
securely to a wood block epoxied to the fuel tank support. The
engine side of the cable attaches with the same bracket I used for the original,
smaller cable, seen in one of the pictures above. I located it where there
was an old pin passing through the engine gear lever, figuring that that must be
the right spot (best combination of leverage and throw ability for the
cable). At the control end, I purchased the largest Morse clevis I could
find locally, only to find that, while the pin size was right, the threaded
end--onto which you thread the cable end--was too small. To combat this, I
drilled the hole larger, and tapped it with the appropriate tap
size--5/16-18. This was actually much easier than I had feared it might
be, and it worked perfectly. while leafing through my Yanmar parts manual, I had ordered a bracket
that was supposed to secure the control cable. I made it work by
installing a wooden support forward of the fuel tank, to which I screwed the
bracket, with the cable captured inside. It didn't end up working, but I
was able to adapt a smaller clamp meant for one of the 33C cables and attach it
securely to a wood block epoxied to the fuel tank support. The
engine side of the cable attaches with the same bracket I used for the original,
smaller cable, seen in one of the pictures above. I located it where there
was an old pin passing through the engine gear lever, figuring that that must be
the right spot (best combination of leverage and throw ability for the
cable). At the control end, I purchased the largest Morse clevis I could
find locally, only to find that, while the pin size was right, the threaded
end--onto which you thread the cable end--was too small. To combat this, I
drilled the hole larger, and tapped it with the appropriate tap
size--5/16-18. This was actually much easier than I had feared it might
be, and it worked perfectly. |
|
Of course, when I went to secure
the cable inside the cockpit locker, the wooden block I had epoxied in earlier
(see above) to accept the screws from the cable clamp was in the wrong place, so
I have to install a new one, just slightly aft. I went out the next day
specifically to install the block with epoxy; I then left it to cure overnight
before proceeding.
After a couple more hours of
work, I finally got the gearshift operating! This was way more work than
it should have been. First, I installed a clamp on the cable inside the
locker (aft of the controls) on my new block that I epoxied in. I thought
this was the right place for it. However, I still couldn't shift all the
way into forward, so something was obviously wrong. I traced the problem
to the gear lever on the engine--thinking that it made sense, I had attached the
engine end of the cable to the  engine
lever where there was a pre-existing pin in place, left over from some previous
installation. I figured that that must be the right spot for it.
Wrong! I ended up moving the attachment further down on the lever (there
are several holes through the lever, allowing for adjustment). This move
meant that less throw was required on the cable to move the gear lever the same
amount. This, combined with moving (again!) the clamp at the other
end of the cable, finally allowed me to shift fully into reverse and forward as
required. engine
lever where there was a pre-existing pin in place, left over from some previous
installation. I figured that that must be the right spot for it.
Wrong! I ended up moving the attachment further down on the lever (there
are several holes through the lever, allowing for adjustment). This move
meant that less throw was required on the cable to move the gear lever the same
amount. This, combined with moving (again!) the clamp at the other
end of the cable, finally allowed me to shift fully into reverse and forward as
required.
The action of the shift is very imprecise,
and lacks any real "thunk" or other tactile feel when the gears are
changed. Additionally, the neutral position does not have much of a
detent, so it looks like it will always require a little jiggling to make sure
it's in neutral. Maybe I can fine tune this later, but more likely I'll
just get used to it.
The controls worked fairly well,
although the throttle creeped badly while underway--this was a real pain.
A friend suggested using a small pair of vice grips to clamp down slightly on
the cable, therefore increasing friction slightly. I haven't had a chance
to try this--and probably won't, since we are replacing the engine and controls
as of this writing. However, I've filed the idea away for future
reference--it's a good tip, and one that I hadn't thought of.
For details on our new single
lever Vetus control, please click here.
|
|