|
Storage
Solutions
This page was last updated on March 18, 2002
Interior: Salon
Interior: Forward Cabin
|
|
Perhaps one of the greatest limitations of the
Triton is a lack of convenient storage. Because of Carl's shapely hull
design, the bilges are extremely slack, and this means that space is very
limited inside the boat. It seems that everywhere you look, the hull
curves up closer and faster than you expect. I suppose this is one of the
tradeoffs for having a boat that looks good in the water and sails well, but it
makes storing some of the gear one might want for longer-term cruising more of a
challenge, to say the least.
Salon
The Triton comes standard with small cutouts
in the tops of the settees offering some limited access to the space
beneath. There were also two drawers built in beneath the settees in the
main cabin. The problem is, these drawers are pretty small by necessity,
as the curvature of the hull behind the fronts prevents the drawers from
extending too deeply. The framework for the drawer supports also cuts
severely into the space available beneath the settees.
As part of the major refit, I attempted to
address some of the storage problems by reconfiguring the main salon and adding
hopefully useful storage in the backrests and against the hull above. For
the most part, this has worked out well, and no changes are planned. You
can see the details of the construction and completion of the settee backs and
such at one of the following links:
Rebuilding the
Interior
Finish Trim, Woodwork,
and Details
|
|
 I
was unhappy with the standard drawers beneath the settees, though, and knew that
there was wasted space there. It so happened that I had also been
searching for a better place to store my toolboxes--I keep three on board:
one for hand tools, one for electrical, and one with fastenings and spare parts,
plus a flatter case that holds all my sockets and ratchets. Last season, I
stored all the toolboxes in the port cockpit locker, which was OK, but not
great. It was really too much weight that far aft, and the slope and
curvature of the hull meant that removing one box meant pretty much removing all
of them. It was far from ideal, but I didn't know where else to put
them. These are all tools, parts and equipment that I consider essential for self-sufficiency
and onboard maintenance and repairs. I
was unhappy with the standard drawers beneath the settees, though, and knew that
there was wasted space there. It so happened that I had also been
searching for a better place to store my toolboxes--I keep three on board:
one for hand tools, one for electrical, and one with fastenings and spare parts,
plus a flatter case that holds all my sockets and ratchets. Last season, I
stored all the toolboxes in the port cockpit locker, which was OK, but not
great. It was really too much weight that far aft, and the slope and
curvature of the hull meant that removing one box meant pretty much removing all
of them. It was far from ideal, but I didn't know where else to put
them. These are all tools, parts and equipment that I consider essential for self-sufficiency
and onboard maintenance and repairs.
Then it hit me: they could be stored
beneath the settees! But I'd have to cut new hatches into the tops to
allow the toolboxes (and other gear) to fit. I didn't think the drawers
would be missed, and access from the top is convenient enough by just lifting up
the cushion. I went out to the boat to check out the situation, and
determined that there was enough space for what I wanted to do. As I
always do when starting a project inside, I spread some towels and cloths around
to protect the cabin sole and such.
|
|
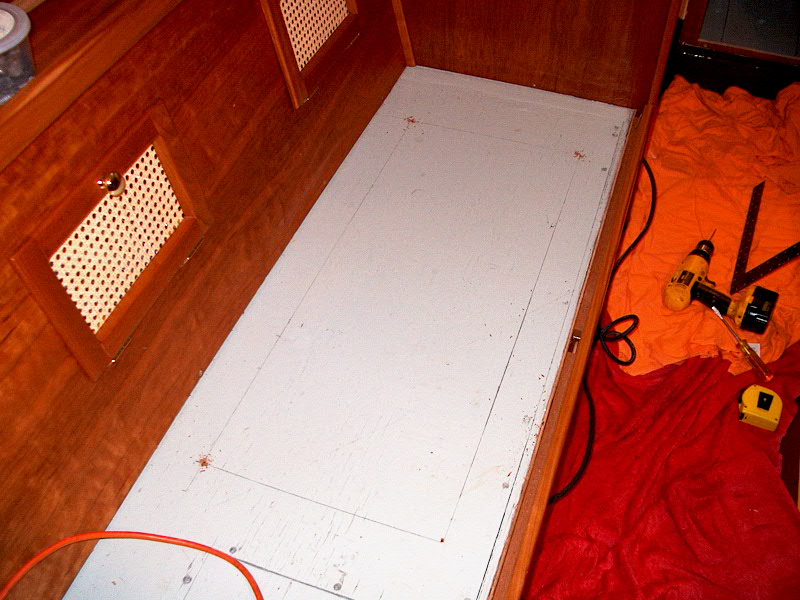
 First,
I marked out the outline of the new opening. I left 3" of material
between the outer edge of the settee and the cut, and 3" between the cut
and the settee back. The opening ended up 34" long and 14" wide
on the port side, and just a bit shorter on the starboard side (where the settee
is shorter). I drilled small holes at each corner to help with the cutting
and give me a place to start the saw, and then cut out the top piece with my
jigsaw. I will be using the cutout piece as the hatch--all it needs are
some cleats beneath the settee top to hold it in place. Eventually, I'll
add some latches of some sort if we do any offshore sailing. First,
I marked out the outline of the new opening. I left 3" of material
between the outer edge of the settee and the cut, and 3" between the cut
and the settee back. The opening ended up 34" long and 14" wide
on the port side, and just a bit shorter on the starboard side (where the settee
is shorter). I drilled small holes at each corner to help with the cutting
and give me a place to start the saw, and then cut out the top piece with my
jigsaw. I will be using the cutout piece as the hatch--all it needs are
some cleats beneath the settee top to hold it in place. Eventually, I'll
add some latches of some sort if we do any offshore sailing.
|
|
 With
the new, large openings, access is terrific, and there's lots of room. I
removed the old drawer frames and fasteners. There's a little painting to
be done--a few areas were inaccessible when I painted the insides of all the
lockers before, but that will have to wait until the weather gets a little
warmer. There's plenty of space for the three plastic toolboxes, as well
as other gear. This will definitely be With
the new, large openings, access is terrific, and there's lots of room. I
removed the old drawer frames and fasteners. There's a little painting to
be done--a few areas were inaccessible when I painted the insides of all the
lockers before, but that will have to wait until the weather gets a little
warmer. There's plenty of space for the three plastic toolboxes, as well
as other gear. This will definitely be  handy in the future.
To cover the openings where the drawers were, I removed the
solid teak drawer fronts from the boxes (they're just screwed and nailed in
place); I'll put these in place and attach them from behind with some small
cleats. handy in the future.
To cover the openings where the drawers were, I removed the
solid teak drawer fronts from the boxes (they're just screwed and nailed in
place); I'll put these in place and attach them from behind with some small
cleats.
|
|
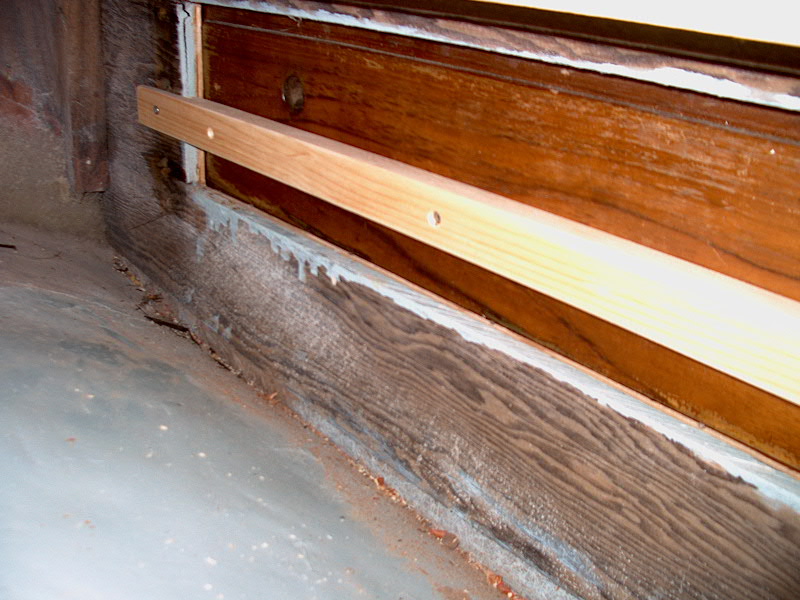
 To
complete the project, I installed hardwood cleats around the edges of the
openings, screwing them in place from above. This allows the hatch to sit
in there and be supported. Mind you, this is not fancy work--you never see
these areas when the cushions are on board. What matters is that it's
functional. If I were building new, I might be inclined to get fancy and
pretty on all aspects of the project, but given that I'm working with 38 To
complete the project, I installed hardwood cleats around the edges of the
openings, screwing them in place from above. This allows the hatch to sit
in there and be supported. Mind you, this is not fancy work--you never see
these areas when the cushions are on board. What matters is that it's
functional. If I were building new, I might be inclined to get fancy and
pretty on all aspects of the project, but given that I'm working with 38  year-old
plywood that was rough to begin with, AND it's completely hidden from view, I
just am not one to spend too much time on detail. (Not that the work is so
bad...but it's not what I would want to look at all the time!) year-old
plywood that was rough to begin with, AND it's completely hidden from view, I
just am not one to spend too much time on detail. (Not that the work is so
bad...but it's not what I would want to look at all the time!)
|
|
 To
complete the job, I reinstalled the old teak drawer fronts in the
openings. To do this, I milled a couple cleats out of scrap lumber to the
proper length to span the entire opening; I also notched the ends slightly,
since the drawer front, when installed in the opening, is not flush on the back
side, and to draw it tightly into place the brace needs to be flush with both
the drawer front and the sides of the cabinet. I screwed through the
cleats into the backs of the drawer fronts, completing the conversion of the
storage lockers. Later, I painted the unfinished surfaces with more of the
Interlux Bilgekote used throughout the interior and lockers. To
complete the job, I reinstalled the old teak drawer fronts in the
openings. To do this, I milled a couple cleats out of scrap lumber to the
proper length to span the entire opening; I also notched the ends slightly,
since the drawer front, when installed in the opening, is not flush on the back
side, and to draw it tightly into place the brace needs to be flush with both
the drawer front and the sides of the cabinet. I screwed through the
cleats into the backs of the drawer fronts, completing the conversion of the
storage lockers. Later, I painted the unfinished surfaces with more of the
Interlux Bilgekote used throughout the interior and lockers.
|
|
 I
read about a good solution for lining interior storage lockers in Ferenc Mate's The
Finely Fitted Yacht, a book filled with more simple, good and interesting
ideas than most others I have seen. To line the lockers simply, cheaply,
and effectively, he recommends using the cheap plastic carpet runners that you
might put down in a heavy traffic area to protect your rug. Available
everywhere, this stuff is dirt cheap, durable, and the little nubs on the bottom
give it just enough air space beneath to promote circulation, while holding the
locker contents away from the surface of the hull. It sounded brilliant,
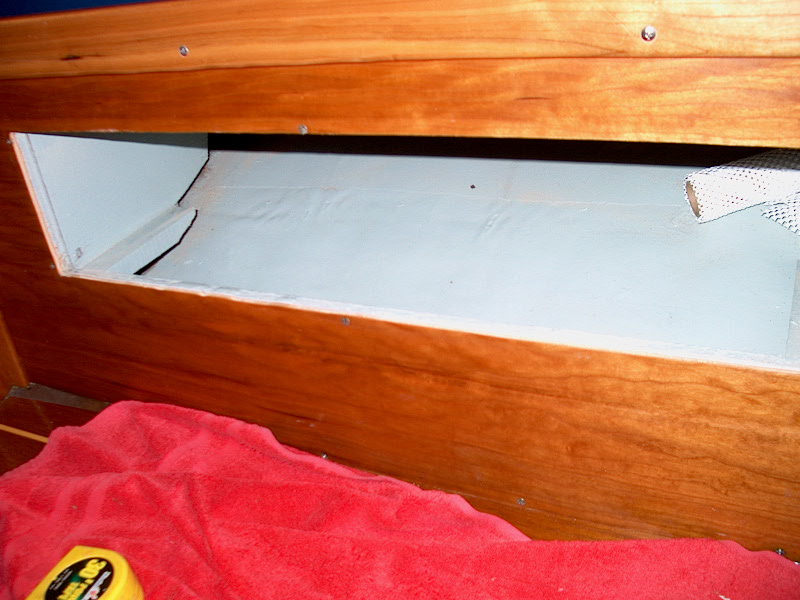
so I decided to give it a try. I lined both of my new storage lockers
beneath the settees with it--the standard width was perfect in this application,
as luck would have it. I cut it to length and smoothed it into place
inside the locker. The fit is tight enough that I shouldn't have to worry
about it sliding around or anything. Time will tell exactly how effective
this is--but I like the idea! I ran out after lining the two settee
lockers, but later I will install more of this product inside the vee berth
lockers as well. I
read about a good solution for lining interior storage lockers in Ferenc Mate's The
Finely Fitted Yacht, a book filled with more simple, good and interesting
ideas than most others I have seen. To line the lockers simply, cheaply,
and effectively, he recommends using the cheap plastic carpet runners that you
might put down in a heavy traffic area to protect your rug. Available
everywhere, this stuff is dirt cheap, durable, and the little nubs on the bottom
give it just enough air space beneath to promote circulation, while holding the
locker contents away from the surface of the hull. It sounded brilliant,
so I decided to give it a try. I lined both of my new storage lockers
beneath the settees with it--the standard width was perfect in this application,
as luck would have it. I cut it to length and smoothed it into place
inside the locker. The fit is tight enough that I shouldn't have to worry
about it sliding around or anything. Time will tell exactly how effective
this is--but I like the idea! I ran out after lining the two settee
lockers, but later I will install more of this product inside the vee berth
lockers as well.
|
|
Forward
Cabin
There were also two relatively small hatches
cut into the vee berth at the factory. These certainly left something to
be desired. I fought with the tight access while running wiring and hoses,
but at the time I didn't want to get into additional projects--I was deep into
the restoration at that point and didn't need anything else on my plate.
To see events that eventually brought me here, please check out the pages
dedicated to the initial work on the interior and forward cabin:
Interior at the Time of
Purchase
Interior Demolition and
Preparation for New Work
|
|
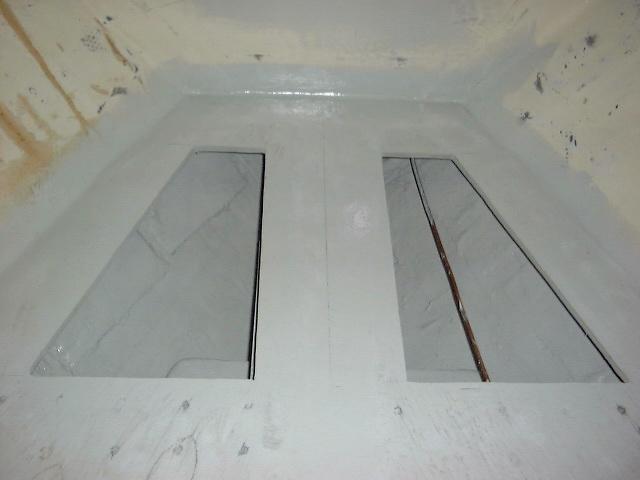
 I
did cut some new hatches in the forwardmost part of the vee, forward of the water tank.
This was completely unutilized space as the boat came from the factory and,
although we haven't put anything up there yet, I know sometime it will be put to
good use. I installed cleats around the edges so that the cutouts could
serve as the new covers for the lockers. This project was completed at a
fairly early stage of the initial restoration. The photo shows the
openings after I painted inside and around, but before the hull liner was in
place and before I installed any cleats to support the hatches. I
did cut some new hatches in the forwardmost part of the vee, forward of the water tank.
This was completely unutilized space as the boat came from the factory and,
although we haven't put anything up there yet, I know sometime it will be put to
good use. I installed cleats around the edges so that the cutouts could
serve as the new covers for the lockers. This project was completed at a
fairly early stage of the initial restoration. The photo shows the
openings after I painted inside and around, but before the hull liner was in
place and before I installed any cleats to support the hatches.
|
|
 Shortly
after cutting the larger hatches in the settees (see above), I decided to make
the port access hatch in the vee berth--the one near the aft bulkhead--larger to
give me more and easier access to the head bulkhead for running the hoses for
the pending holding tank project, and also to make access better for
storage. I penciled in a line as large as I could and cut out the opening
with a jigsaw. As with the other openings, I will add cleats around the
edges to hold the hatch in place. The wires you see in the photo will be
retied up beneath the plywood alongside the hull; the clamps were removed in
order to make the new cut. The white hose is the new hose from the head
Y-valve that is eventually to be connected to the holding tank through the
bulkhead at the bottom of the photo. To complete the project, I installed
cleats around the edges of the new opening to support the hatch. (See
above for how I did this in the salon on the settees.) Shortly
after cutting the larger hatches in the settees (see above), I decided to make
the port access hatch in the vee berth--the one near the aft bulkhead--larger to
give me more and easier access to the head bulkhead for running the hoses for
the pending holding tank project, and also to make access better for
storage. I penciled in a line as large as I could and cut out the opening
with a jigsaw. As with the other openings, I will add cleats around the
edges to hold the hatch in place. The wires you see in the photo will be
retied up beneath the plywood alongside the hull; the clamps were removed in
order to make the new cut. The white hose is the new hose from the head
Y-valve that is eventually to be connected to the holding tank through the
bulkhead at the bottom of the photo. To complete the project, I installed
cleats around the edges of the new opening to support the hatch. (See
above for how I did this in the salon on the settees.)
|
|